Set up Studio
Setting up Studio connects a Studio project to your stack and adds Studio to your app. This page shows what you'll set up and the order to do it in.
The example on these pages is the Blog project, connected to the Blog stack. Its site runs at http://localhost:3106, and the Blog post template shows the post AI 101 at /blog/ai-101.
Setup happens in two places
First you create a project in Studio. Then you add Studio to your app's code.
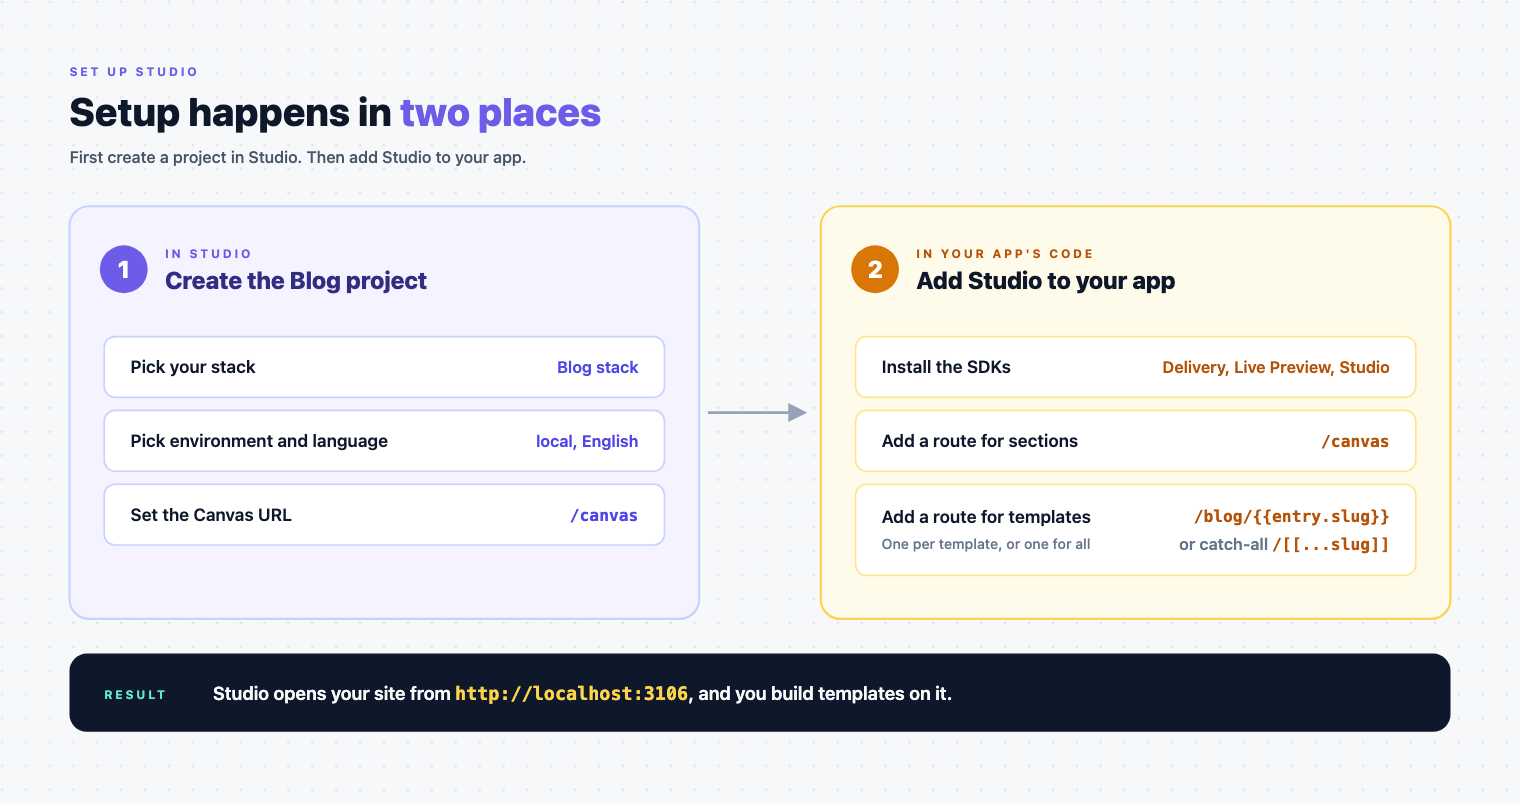
| Where | What you do | In the example |
|---|---|---|
| In Studio | Create the project, pick its stack, and set its Environment, Language and Canvas URL. You can also turn on Enable Freeform Feature. | The Blog project, on the Blog stack, with local, English and /canvas |
| In your app's code | Install the Delivery SDK, Live Preview and the Studio SDK. Add a route with <StudioCanvas /> that previews sections, and routes with <StudioComponent /> that show templates. A catch-all route can show every template from one place. | <StudioCanvas /> on /canvas, and <StudioComponent /> on /blog/{{entry.slug}}, served by the catch-all route app/[[...slug]]/page.tsx |
A few things to know:
- The Delivery SDK fetches your content. Studio doesn't fetch content on its own.
- Sections and templates use different components. Sections are previewed through
<StudioCanvas />, and templates show through<StudioComponent />. You can't swap one for the other. - Studio opens your site from its Base URL. That's the URL your environment has for the project's language, such as
http://localhost:3106for English onlocal.
The steps, in order
| Step | Page | What you do |
|---|---|---|
| 1 | Prerequisites | Check your stack, your app and your permissions |
| 2 | Create a project | Create the Blog project and its Compositions content type |
| 3 | Configure your project | Set the environment, language and Canvas URL |
| 4 | CSR or SSR | Choose whether your template pages render in the browser or on the server |
| 5 | Install the Delivery SDK | Create the stack your app fetches content with |
| 6 | Install Live Preview | Add Live Preview to that stack and your app |
| 7 | Install the Studio SDK | Install and set up the Studio SDK |
| 8 | Mount the section preview route | Add <StudioCanvas /> on /canvas |
| 9 | Wire template preview routes | Add <StudioComponent /> on /blog/{{entry.slug}} |
| 10 | Render on the client or Render on the server | Fetch the layout where you chose to in step 4 |
| 11 | Verify your setup end to end | Check your project settings, a section and a template on the canvas, and a deployed template on your site |
Keep this order. Three steps need the ones before them:
- Create the project before you install the Studio SDK. Creating the project creates the content type whose UID the Studio SDK needs. If the SDK names a different content type, Studio shows "Content Types Don't Match" and loads nothing.
- Install the Delivery SDK before the Studio SDK. The Studio SDK takes the stack the Delivery SDK creates as
stackSdk, and reads its Live Preview settings from it. - Choose client or server rendering before the installs. The choice decides how your template pages fetch the layout.
Let an AI agent do it
If you work with an AI agent, the skill pack can do most of this setup for you. Install the Studio skills in your project, then ask your agent in plain words to set up Studio. It uses convert-project-to-studio, which installs the SDKs, adds the canvas route, adds Studio as a fallback route, configures the project and checks it.
You can also ask for one step at a time:
| Step | Skill |
|---|---|
| 1, Prerequisites | analyze-project-fit for your app, and enable-visual-experience for your stack's Live Preview |
| 5 to 7, the three installs | install-studio |
| 9, template preview routes | setup-template-preview-routes |
| 11, verify | verify-setup |
The skills don't create your stack, tokens or environment. Do that in Contentstack first. See Set up Studio with skills and What are skills?
Try Studio without an app first
If the project has no Base URL, Studio shows its Playground canvas instead of your site. The Playground canvas doesn't need your app or the Studio SDK, so you can try Studio before you write any code. On the Playground canvas, Deploy is turned off. See Try Studio without an app.
Before you start
- Check what you need in your stack and your app on Prerequisites.
- Check that your organization has Studio, in Check that Studio is available to your organization.