Register breakpoints
Register breakpoints to give the viewport picker your site's screen sizes and to set the media query each breakpoint uses. You do it once, in your app's code, before anyone styles on the canvas. To register your colors, spacing and type scale, see Register design tokens.
The example on this page is the Blog project. The Blog site registers three breakpoints of its own, with queries at 1024px and 640px.
Prerequisites
- You've installed
@contentstack/studio-reactin your app. See Install the Studio SDK. - You've made sure that every route that renders Studio content loads your registration code, including your canvas route. Studio reads your breakpoints from your app running in the canvas.
What this is and what you get
After you register breakpoints, the viewport picker lists them, and Studio wraps a style in your media query.
Register once. A second registerBreakpoints call replaces the whole set.
Faster ways to do this
- Skill. The
register-breakpointsskill writes aregisterBreakpointscall and then checks the viewport picker. Check the call against the field rules on this page. See register-breakpoints. To install skills, see LLM skills.
Register your breakpoints
Studio ships three breakpoints, so a site that never registers still has Desktop, Tablet and Mobile.
| Breakpoint | Query | Preview size |
|---|---|---|
| Desktop | None | 1200 x 800 |
| Tablet | (max-width: 1023px) | 800 x 600 |
| Mobile | (max-width: 767px) | 400 x 500 |
Registering your own breakpoints replaces the shipped three. Each breakpoint has these fields:
| Field | Rule |
|---|---|
id | Required and unique. The first breakpoint must have the id default. |
displayName | Optional. If you leave it out, Studio labels the breakpoint with its id. Two breakpoints can share a displayName. |
query | The first breakpoint has none. Studio doesn't check the others, so set it on each one. |
previewSize | Set it on every breakpoint, with width and height. Studio throws if a breakpoint after the first has none. The preview size sets the canvas frame's size when you select that breakpoint. It doesn't change your live site. |
Register the widest breakpoint first and the narrowest last, because Studio emits the media rules in registration order.
To register the Blog breakpoints:
-
Call
registerBreakpointsonce, in a file your app loads at start.import { registerBreakpoints } from "@contentstack/studio-react";registerBreakpoints([{ id: "default", displayName: "Desktop", previewSize: { width: 1200, height: 800 } },{id: "tablet",displayName: "Tablet",query: "(max-width: 1024px)",previewSize: { width: 768, height: 1024 },},{id: "mobile",displayName: "Mobile",query: "(max-width: 640px)",previewSize: { width: 375, height: 812 },},]); -
Register breakpoints in the bundle that renders your live site too. A site that doesn't register uses the shipped three. This step shows nothing yet. You check the result in step 3.
-
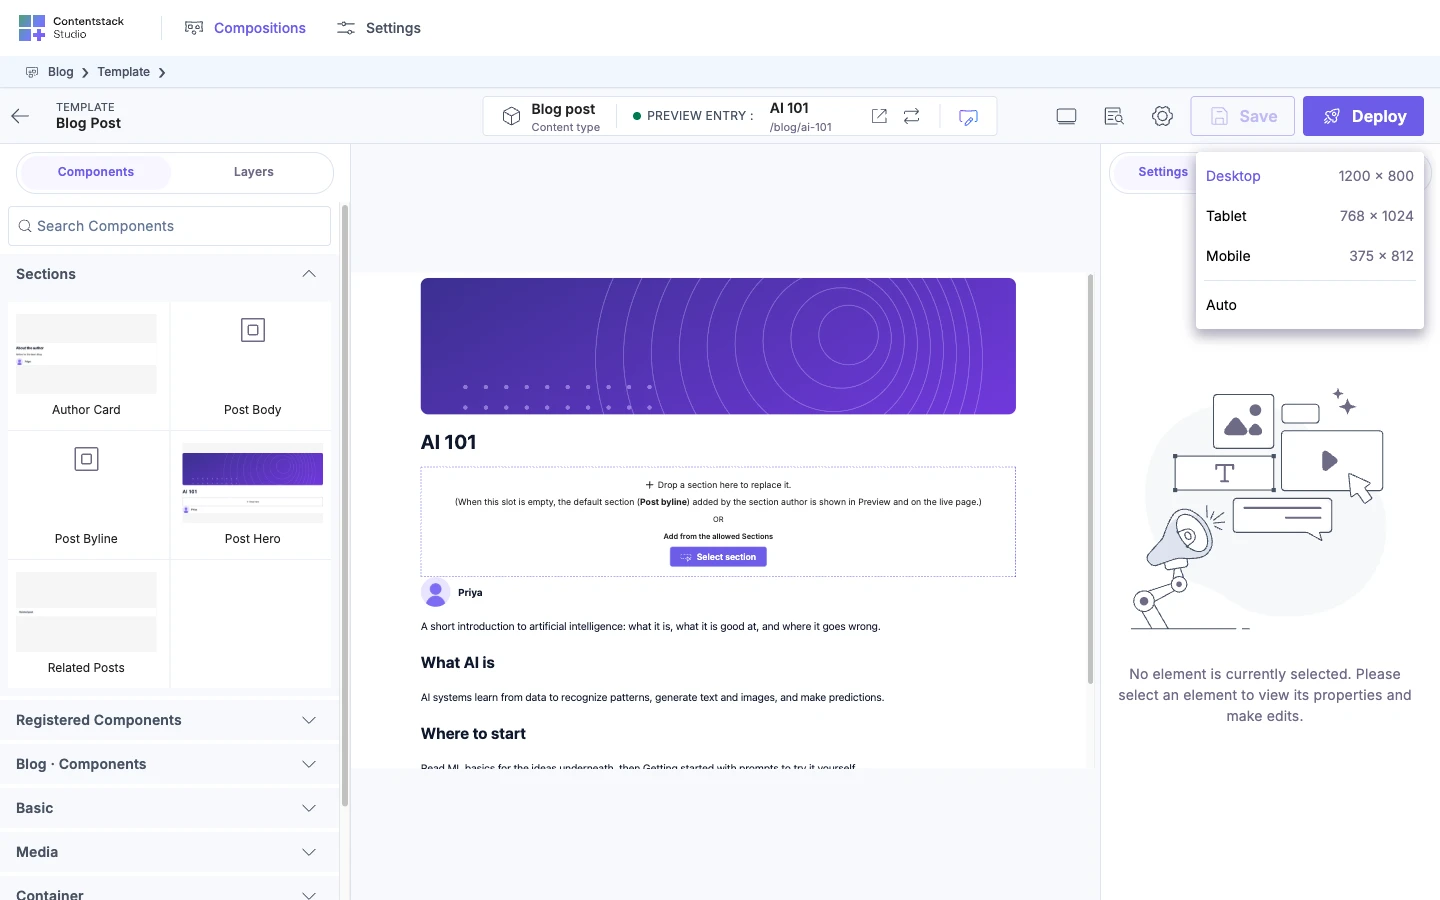
Check your breakpoints. Open the Blog post template. In the top bar, select the monitor icon, Toggle Viewport.
The picker lists each breakpoint with its preview size, then Auto. For Blog, that's Desktop 1200 x 800, Tablet 768 x 1024 and Mobile 375 x 812. Until your site loads and sends its breakpoints, the picker shows Studio's copy of the shipped three.
If it doesn't work
| What you see | Why | Fix |
|---|---|---|
First breakpoint must be default | The first entry doesn't have the id default. | Put the default breakpoint first. |
Default breakpoint should not have a query | The default breakpoint has a query. | Remove its query. |
Duplicate breakpoint name 'tablet' | Two breakpoints share an id. Your id shows in the quotes. | Give each breakpoint a unique id. |
Breakpoint 'previewSize' is required or Breakpoint 'id' is required | A breakpoint after the first has no previewSize or no id. | Add the missing field. |
After a duplicate-name or missing-field error, saving the fix still throws Duplicate breakpoint name 'default'. | Studio keeps the ids from the failed call until the page reloads. | Reload the page. |
To decide what authors can change on one of your components, see Make your components styleable. To register your colors, spacing and type scale, see Register design tokens. To see how breakpoints reach your live site, see How styling works.