Check That Studio is Enabled for Your Organization
Before you install SDKs, register components, or open any of the walkthroughs, verify Studio is actually turned on for your Contentstack organization. If it isn’t, every step downstream will look like it succeeded until the canvas fails to load, and there’s no error message that points at the real cause.
Do It With a Skill
No skill can do this one. Whether Studio is enabled for your organization is an entitlement on your Contentstack plan, so it is settled by your account team, not by anything in your project.
Once access is confirmed, the stack-level toggle that follows it is automatable: enable-visual-experience turns on Live Preview and Visual Experience for a stack, which every later Studio step depends on.
The 10-Second Check
- Open app.contentstack.com and sign in.
- Click the app-switcher, the 3×3 grid icon at the top-right of the navbar.
- Look for a Studio tile in the menu.
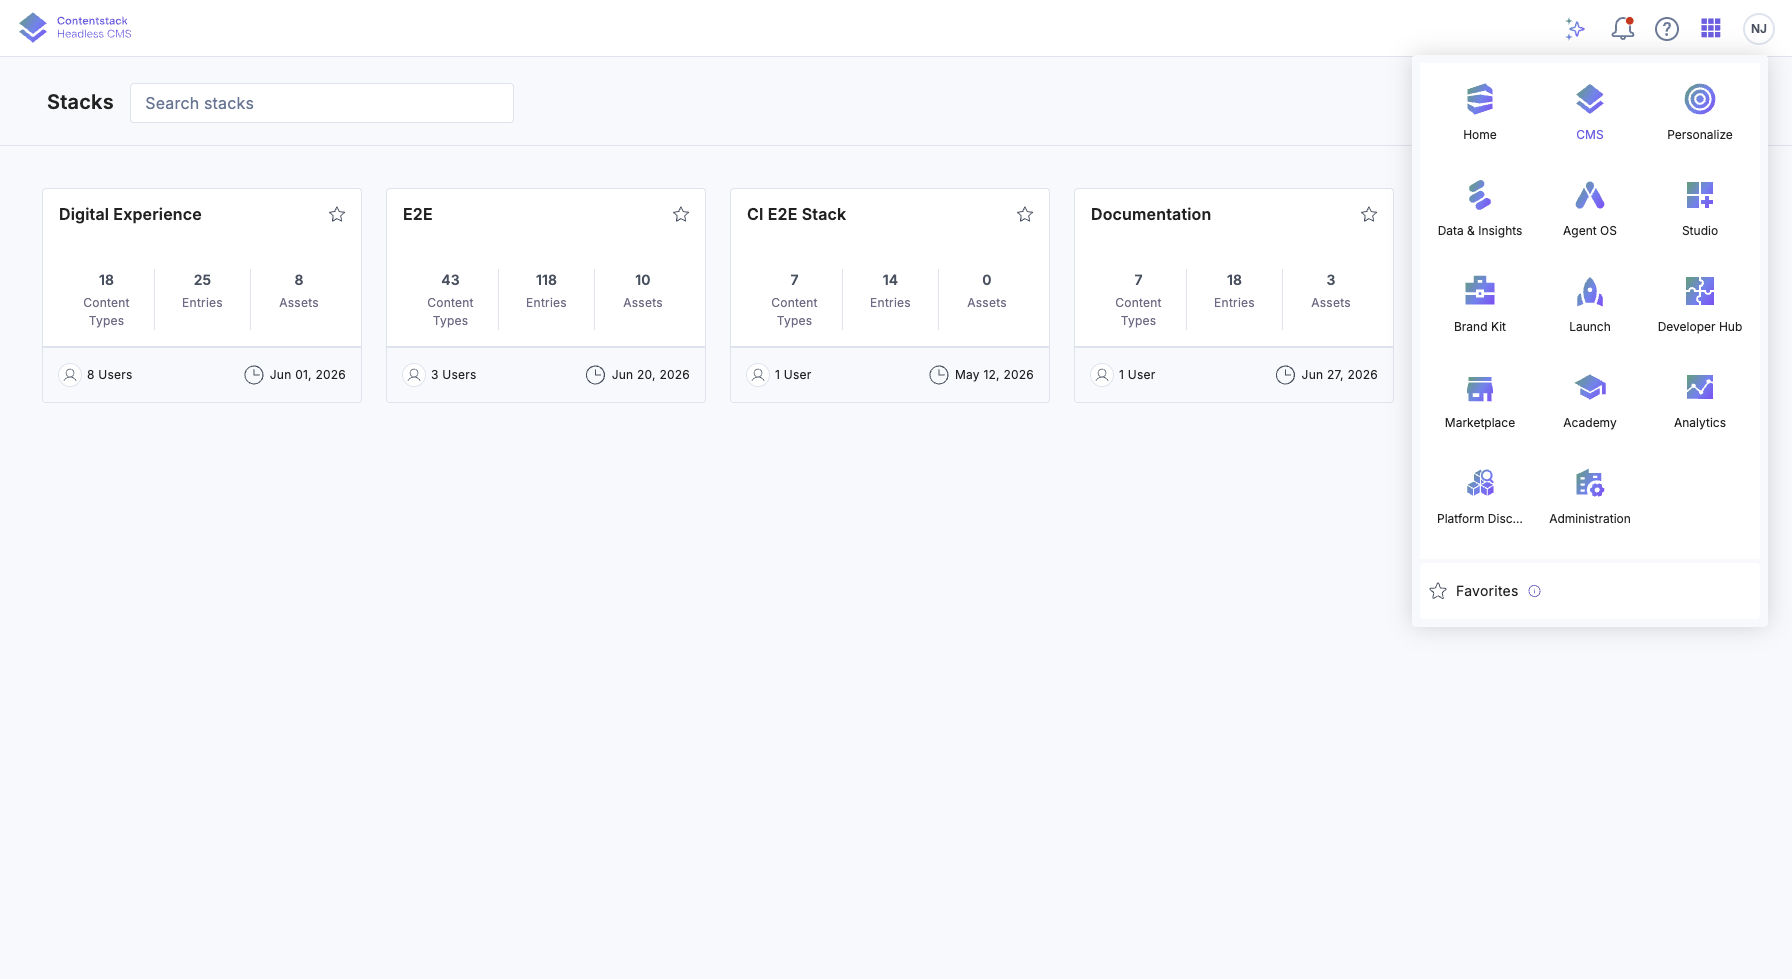
Results
- Studio tile is present: Studio is enabled for your organization. Continue with whichever walkthrough sent you here (Setup, Enterprise day one, Zero to first page, Two ways to start).
- Studio tile is missing: Studio is not enabled on your organization yet. Contact Contentstack Support to have it turned on. Everything else in these docs assumes access to the Studio product area, so there’s no working around it locally. The platform gate must be lifted first.
Orient Yourself: What Studio Actually Looks Like Once You Open a Composition
When you open a Studio composition, the app switches into a three-panel layout organized around the canvas. Every author + engineer touches this same layout. Knowing what each region is (and where each one gets its content from) prevents the “which panel drives what?” confusion that costs an hour on day one.
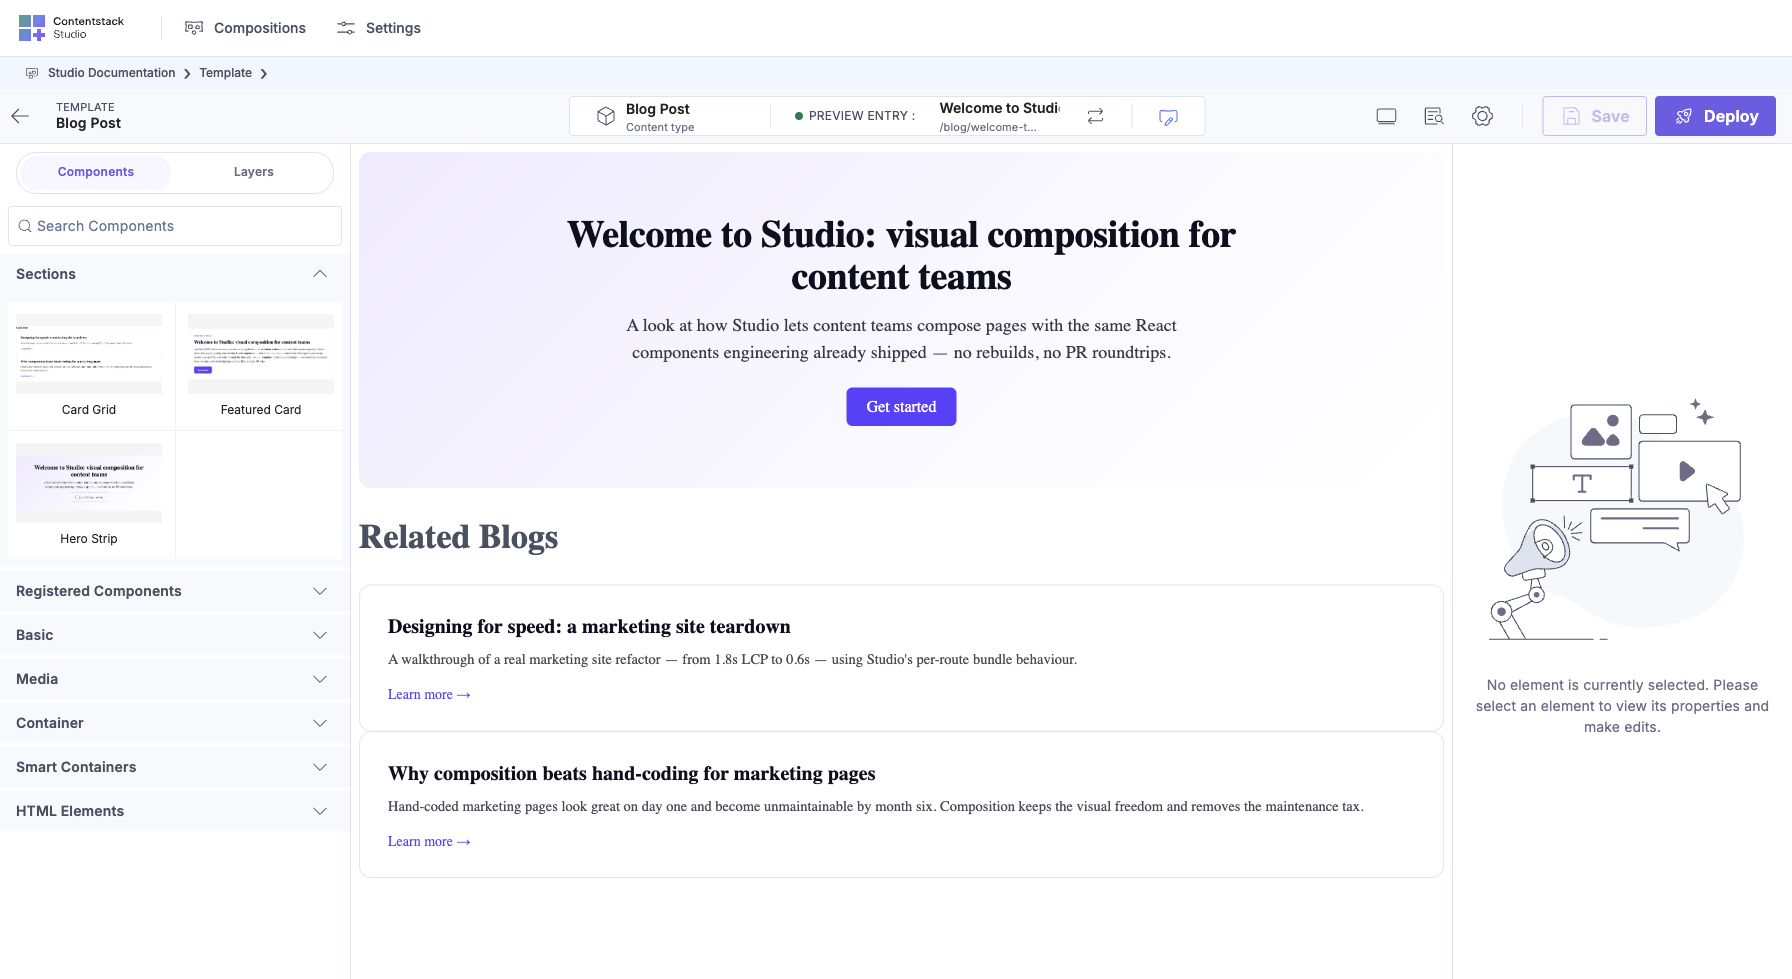
| Region | What it is | Where its content comes from |
|---|---|---|
| Left panel | Two tabs: Components (the palette of registered React components you can drag onto the canvas) + Layers (the tree of everything currently placed) | Studio, driven by your registerComponent(...) calls in your app |
| Center: the canvas iframe | Your real running app, loaded inside an iframe. For a Section, Studio iframes <Canvas URL>/canvas and expects <StudioCanvas /> mounted there. For a Template, Studio iframes the template’s URL pattern (e.g. /blog/welcome-to-studio) and expects <StudioComponent /> on the catch-all route. Same React, same components, same CSS, same SDK, served by your app, not by Studio | Your app running at the Canvas URL (dev: http://localhost:3006, prod: your deployed origin) |
| Right panel | Tabs for the currently selected element: Properties (prop values + binding chips), Design (spacing, colors, layout tokens, see design tokens), Settings (composition-level metadata). A Data tab appears only when Freeform is enabled on the project (Pin Entry / Pin Query). The screenshot above shows the project with Freeform off, so the Data tab is absent. Until you select something on the canvas the right panel shows a “No element currently selected” placeholder. | Studio, but the values it edits flow into the iframe via postMessage and re-render your components in place |
The one insight worth internalising on day one
Studio’s canvas is not a rendering engine. The middle panel is a remote-controlled window into your running app, same React tree a visitor gets, mounted inside an iframe. The left and right panels just talk to it via postMessage. Everything you see on canvas is what your visitors see. If your dev server isn’t running, or the Canvas URL is wrong, the iframe is blank, and there’s no separate “Studio renderer” to fall back to.
Practical consequences:
- When you register a new component in code (registerComponent(...)), it appears in the left panel because the iframe re-runs your app on reload and the postMessage bridge pushes the palette update.
- When Studio’s canvas won’t load, the fix is almost always in your app: dev server not running, wrong Canvas URL, missing <StudioCanvas /> / <StudioComponent /> mount, studioSdk.init() not called at boot. One exception: if Studio shows “SDK Not Initialized” or your browser refuses the iframe with a mixed-content / “connection blocked” / “private network” error, that’s the browser refusing to embed your http://localhost iframe inside Studio’s https:// page. Every major browser (Chrome, Brave, Edge, Safari, Firefox) blocks this by default with different error copy. One fix (local HTTPS via mkcert) works everywhere. See Troubleshoot: Studio can’t reach your localhost canvas.
- Studio doesn’t need CDN access to your compiled JS. The iframe loads your app directly, including live-reloaded dev builds during authoring.
Setup (Setup) is where you wire the two mount points the iframe needs: the section preview route (<StudioCanvas />) and the template preview route (<StudioComponent />).
Why We Surface This up Front
The Studio SDKs install fine without access, studioSdk.init() runs, the canvas route mounts and looks correct in the browser. The failure only shows up when the canvas tries to load a Studio project, which requires that Studio be enabled for the org that owns the stack. Catching this at the start saves 20 to 30 minutes of “why is the canvas blank” investigation later.
What Support Needs From You
- Your organization’s UID or name.
- The stack you plan to use with Studio (name + API key).
- Confirmation that your Contentstack plan includes Studio (or a note that you’re evaluating).
Once Studio is Enabled
Come back to whichever page sent you here:
- Setup: install SDKs, wire routes, verify.
- Two ways to start: pick the Enterprise or Quickstart onboarding path.
- Enterprise day one: the 30-minute BYOC recipe.
- Zero to first page: the complete walkthrough from nothing to a rendered page.
- First page in 5 minutes: evaluator quickstart.