How a Page Ships: Without Shipping Code.
The Lifecycle
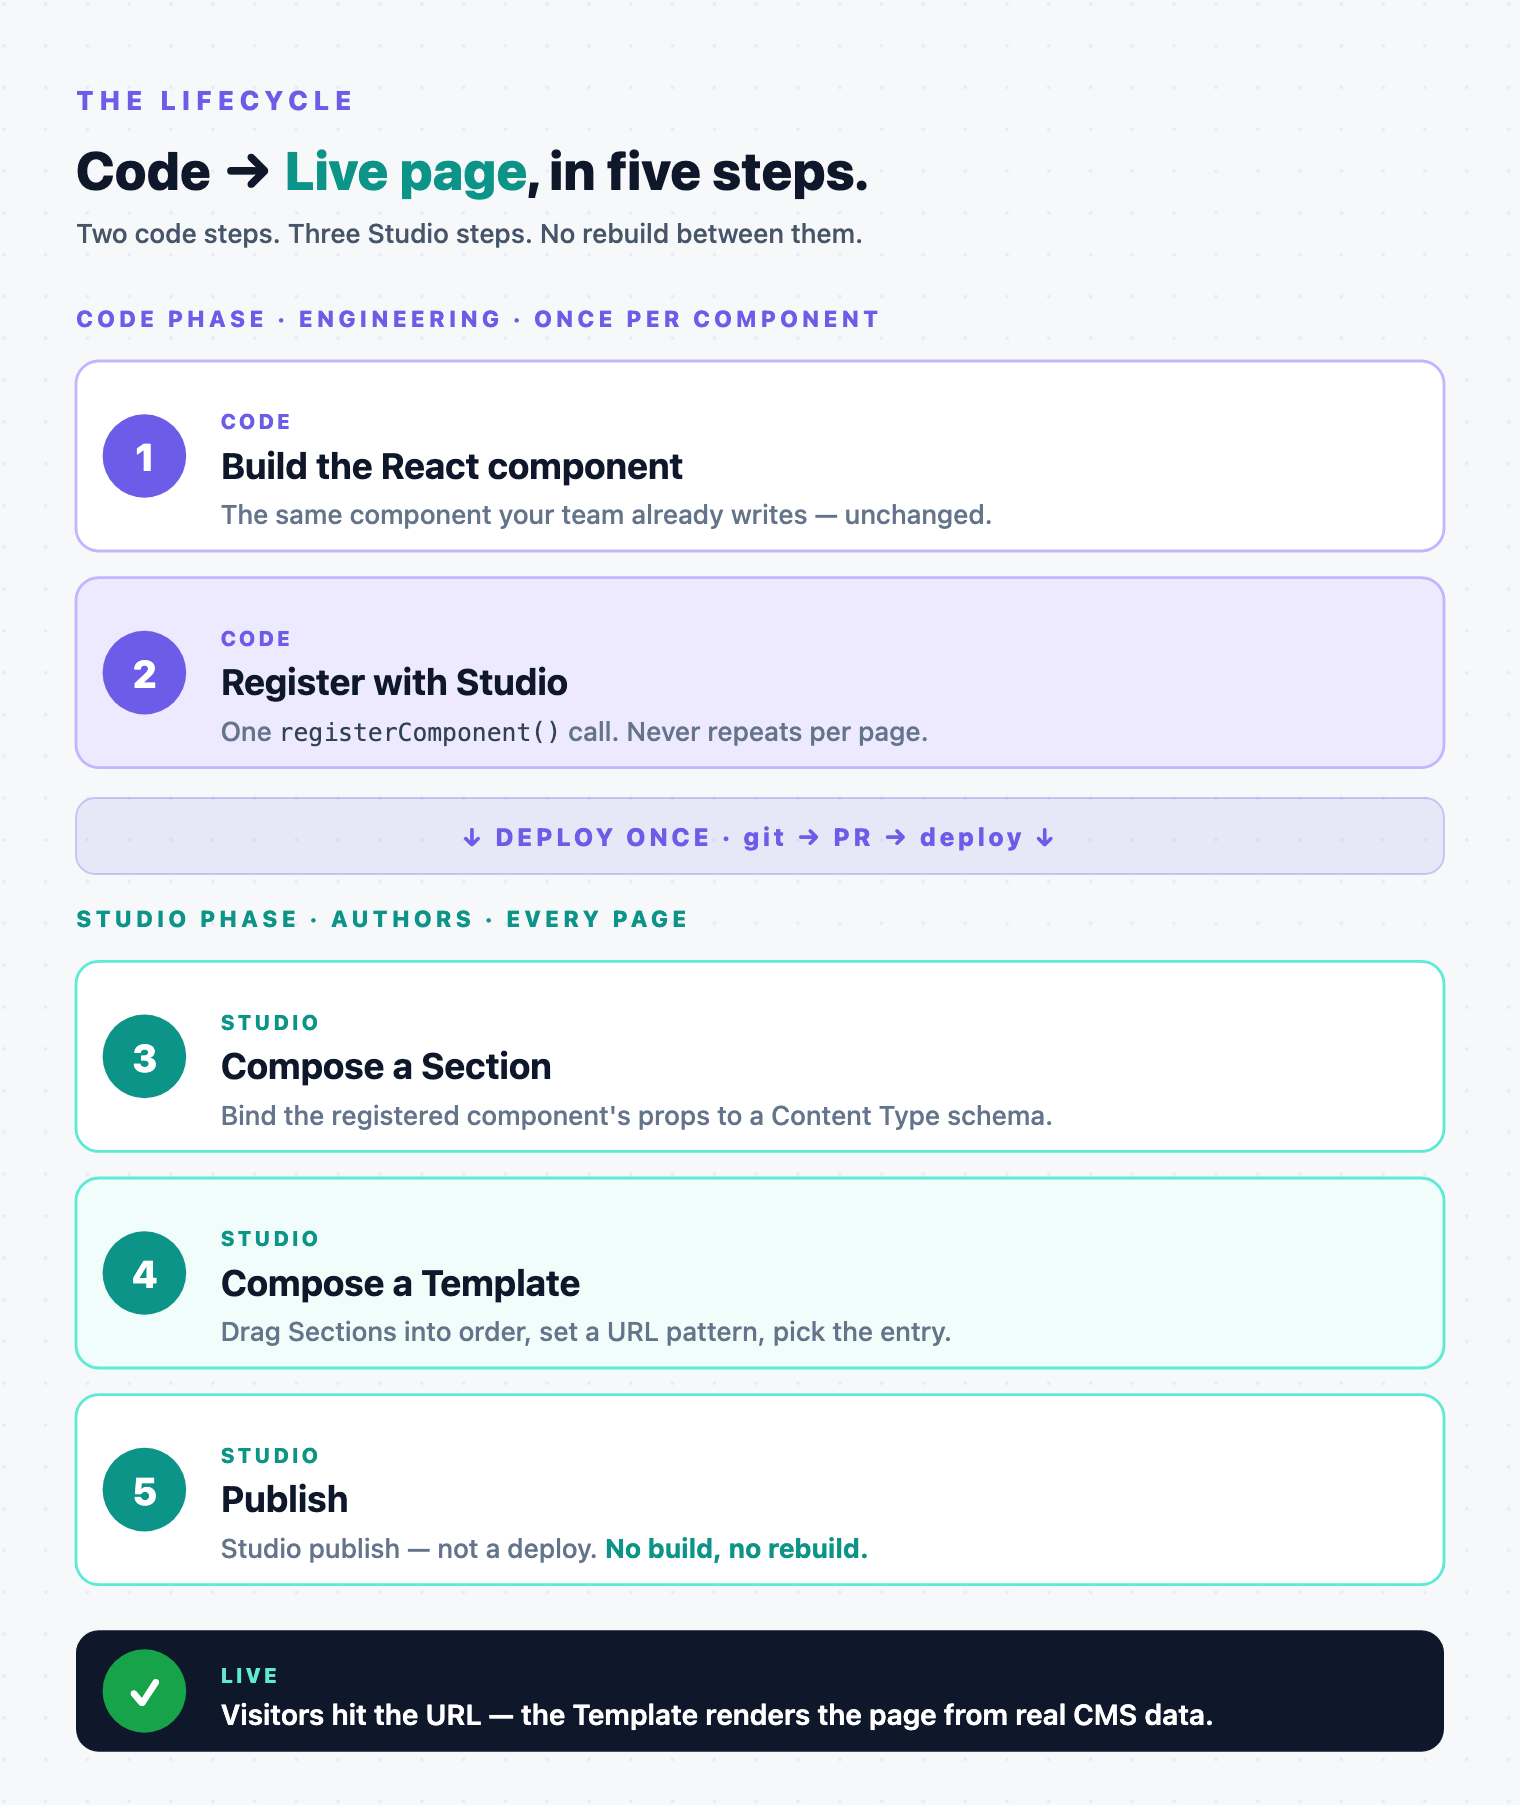
Six steps end-to-end. The first two ship through git, PR, and a deploy (your normal SDLC). The next three ship through Studio’s publish: same React, same CMS, no rebuild. Below: where each step lives, who owns it, and what you don’t have to repeat per page.
Do It With a Skill
studio-tour walks the with-Studio flow described here, stage by stage.
curl -fsSL https://studio-documentation.contentstackapps.com/install.sh | sh
The Engineering Lifecycle: Side by Side
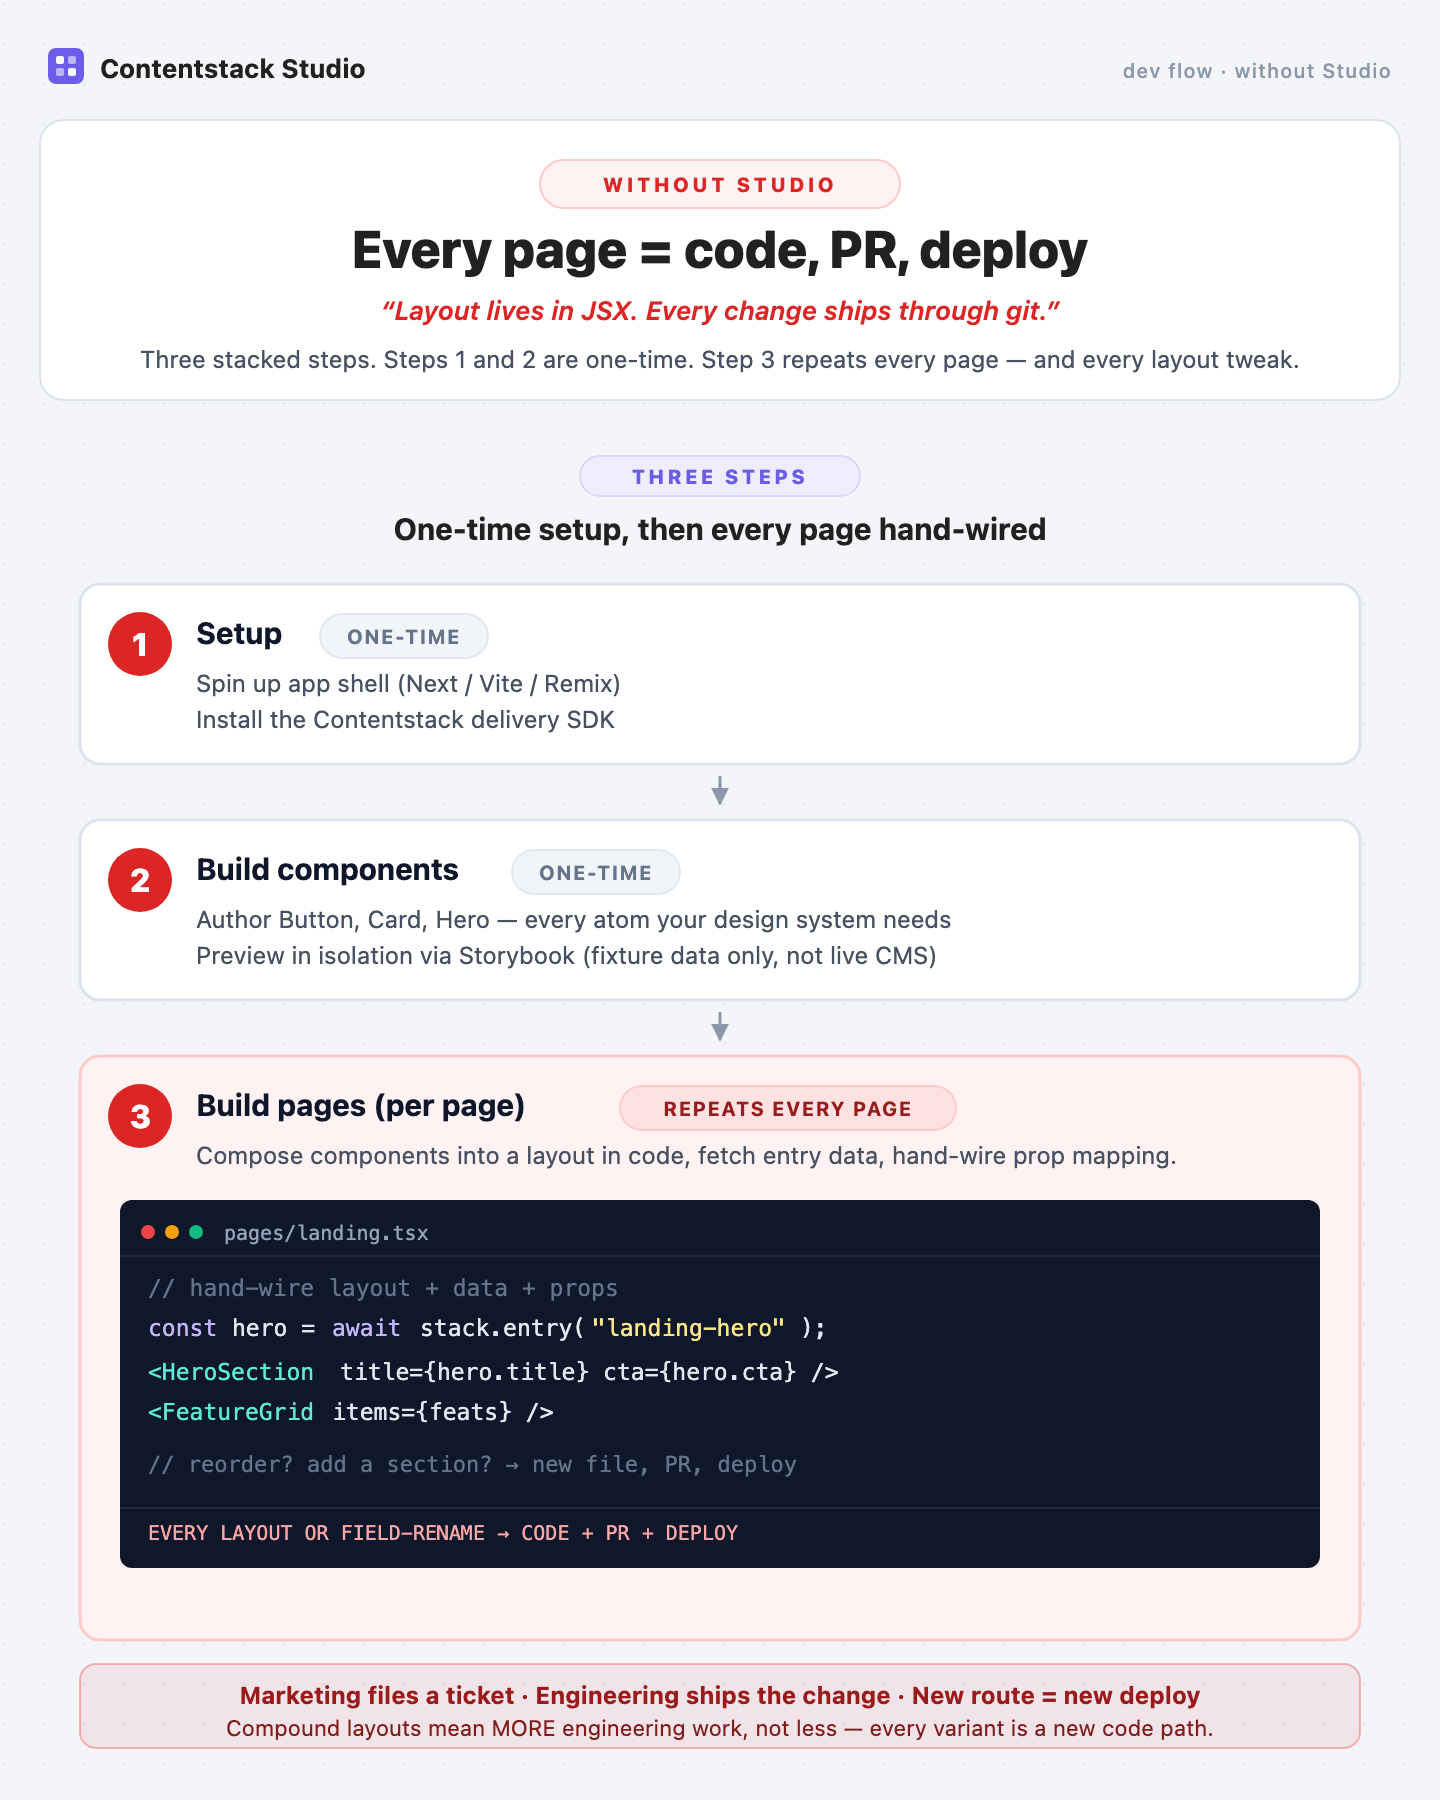
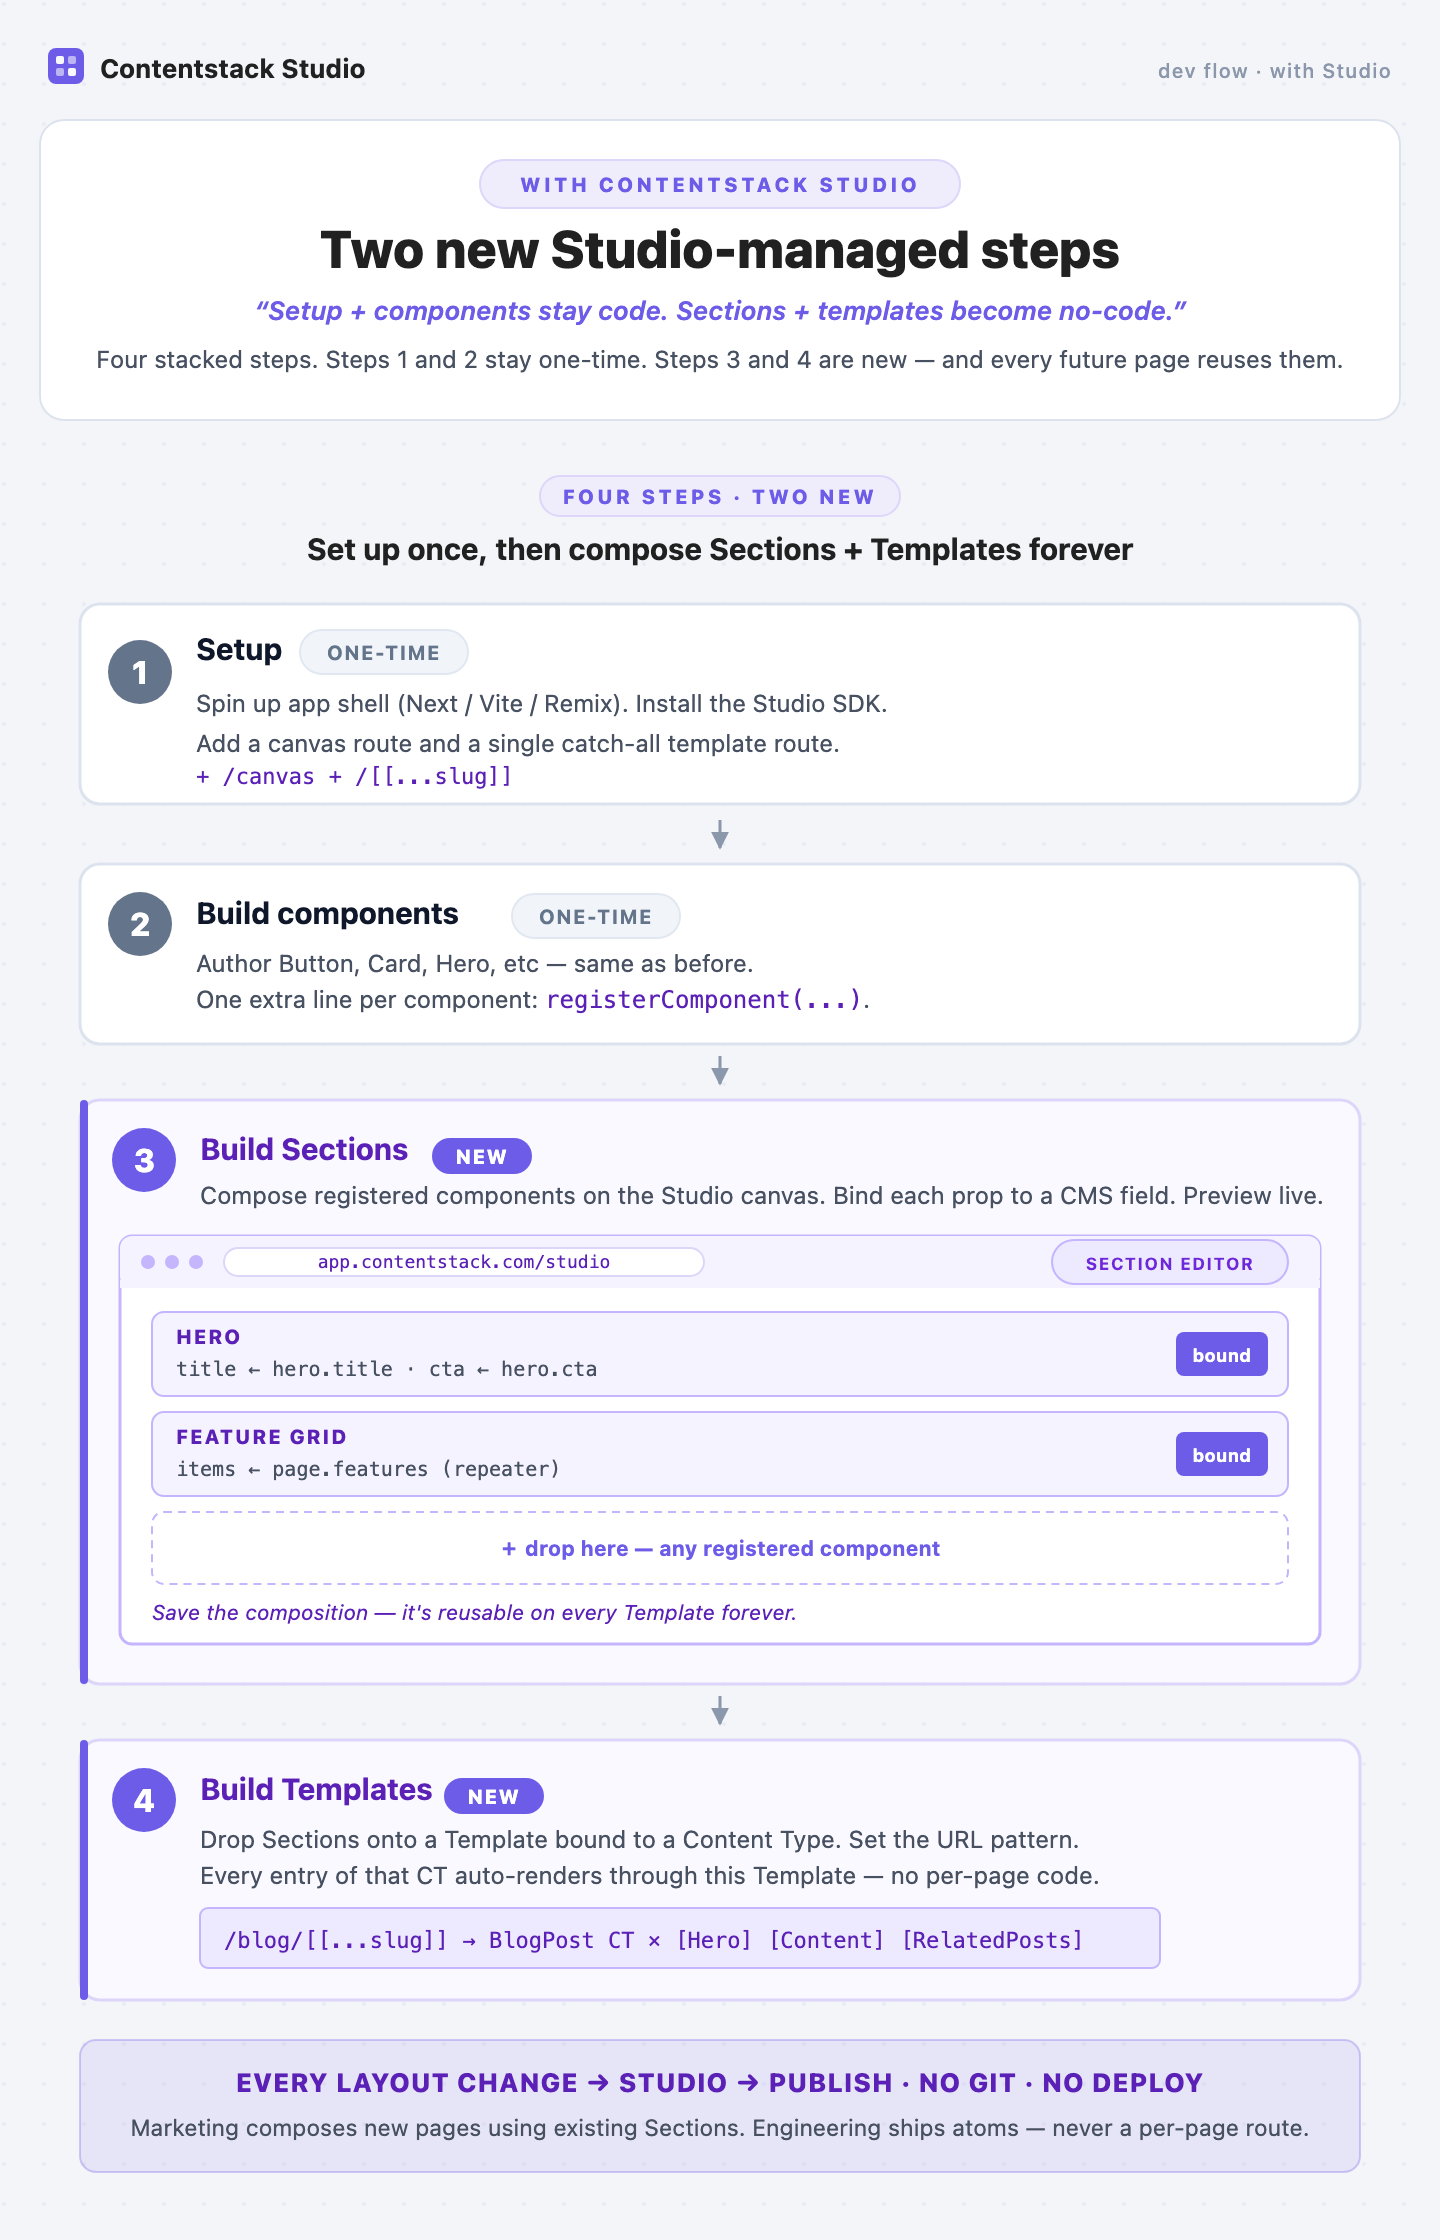
The Section / Template model changes what each step of building a page looks like. Without Studio, every page’s layout, fetch, and prop-mapping is hand-wired in code. Every layout change ships as a code change. With Studio, two new steps (build Sections and build Templates) turn a page into a composition that authors can rearrange without a deploy.
The Per-Page Flow: Before / After
Once your team’s engineering lifecycle is in place (above), every individual page moves through this before / after, a two-column decomposition of what a developer actually does per page, with the code that ships in each column.
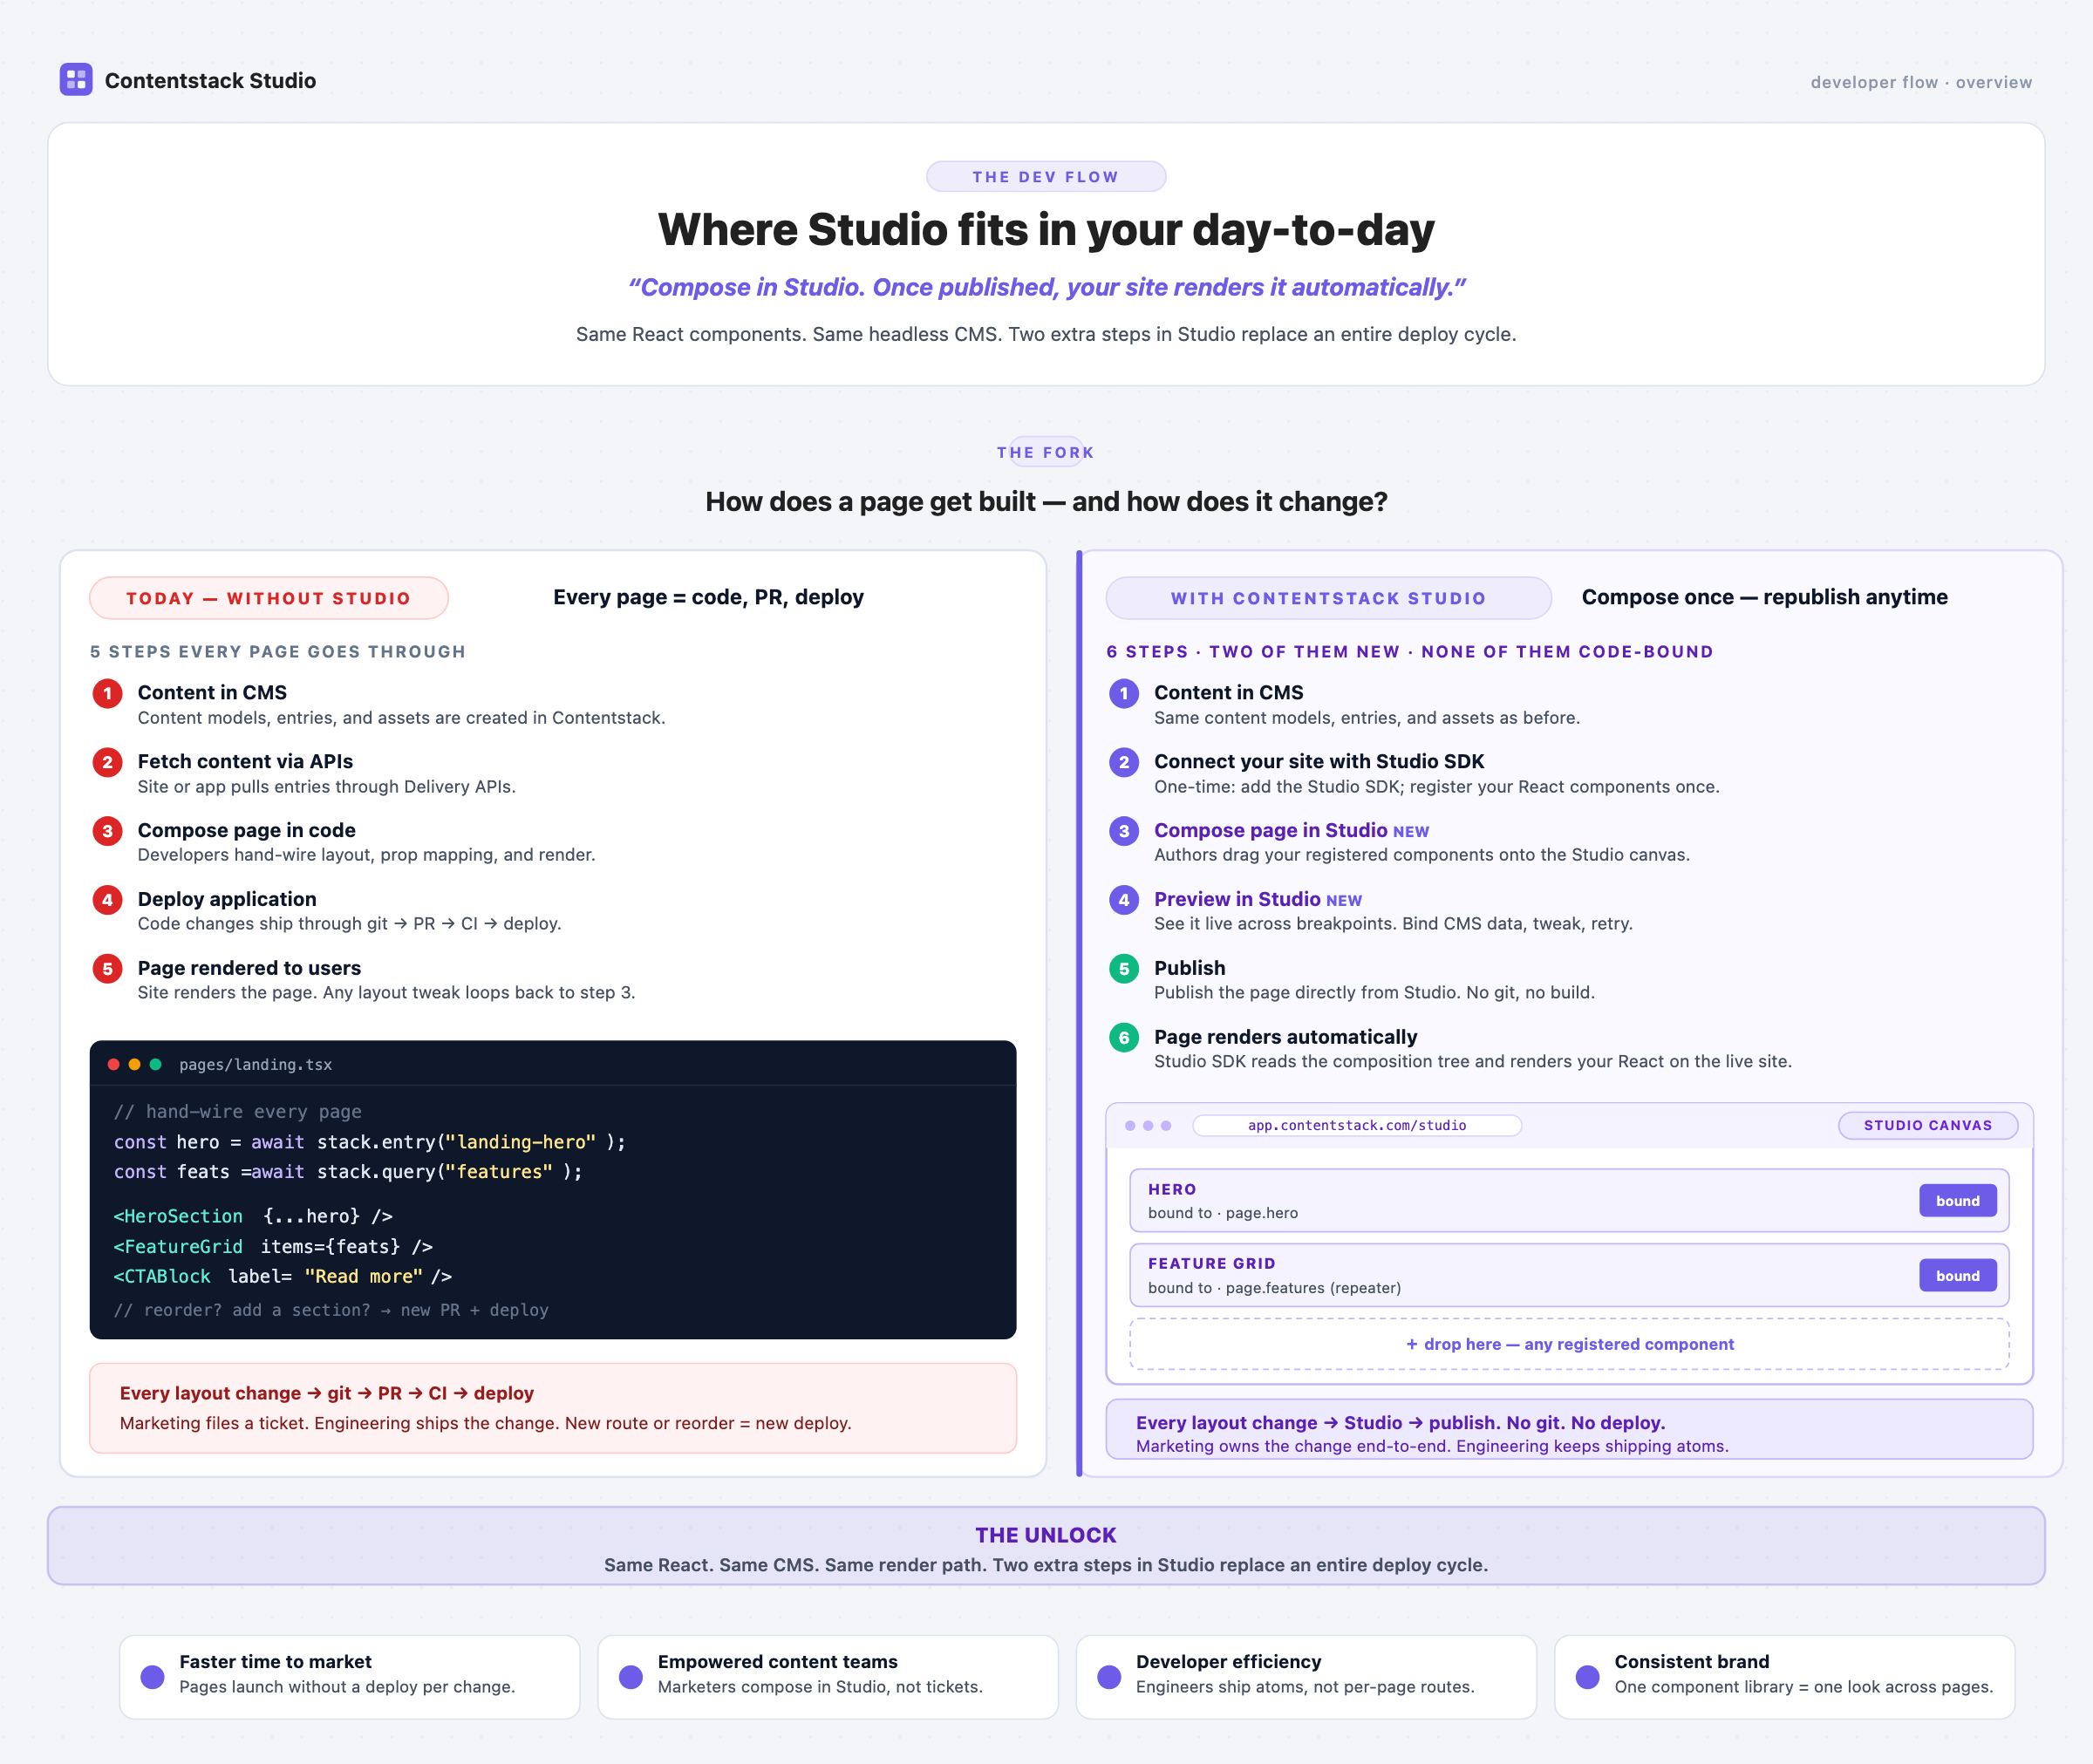
For the horizontal one-scan version optimized for first-touch readers, see Where Studio fits in your day-to-day flow on the docs home.
What You Do, Side-by-Side
| Step | Without Studio | With Studio |
|---|---|---|
| Setup | App shell + Delivery SDK | App shell + Delivery SDK + Studio SDK + canvas route + ONE catch-all template route (handles every URL) |
| Build components | Author + Storybook (isolated, fixtures) | Author + Storybook + register in Studio (1-liner or via CLI) |
| Compose multiple components | In code, per page | In Studio as Sections (reusable, previewable with real data) |
| Build a page | Hand-code layout + data-fetch + prop-mapping per page | Build a Template once, drop Sections, bind to fields, done |
| Change page layout | Code change, then PR, then redeploy | Author in Studio, then publish |
| Re-map a prop to a different CMS field | Code change, then PR, then redeploy | Click the binding, pick a different field, then publish |
| Preview a composed page with real data | Build + deploy + visit URL | Open the Section/Template canvas, pick a preview entry |
| Launch a new content type page | New route + new layout file + new fetcher | Drop a new Template against the content type, drop Sections |
What Stays the Same
Studio isn’t trying to take over your stack:
- Your components stay in your repo: same build, same bundler, same deploy
- Your design system stays sovereign: Studio uses your components, tokens, breakpoints. Not its defaults
- Contentstack stays Contentstack: entries, content types, locales, publishing, branches, webhooks all work the same way
- Storybook still does its job: isolated component preview is still its lane
- Your existing pages keep working: Studio is additive. You can adopt it Section-by-Section, Template-by-Template
When You’d Still Use Code (and Why That’s Fine)
Studio is for layout + composition + binding. Some things are still better done in code:
- Component implementation itself (Studio doesn’t write components for you: it composes them)
- App-level concerns (auth, analytics, error boundaries). Studio handles page routing via Template URL patterns + a catch-all, but the surrounding app shell stays in code
- One-off complex logic inside a component (data transforms, animations, integrations)
- Server-side data fetching strategy (Studio supports CSR + SSR but you choose the path)
The right way to think about Studio: the layer above components, the layer below the app shell. Everything above stays code. Everything below stays code. The composition in between becomes data.
Two Paths to Onboard
Depending on where you are, pick the onboarding path that matches:
- Enterprise / bringing your own components first: for teams shipping with their own design system
- Just exploring: for evaluators using Studio’s defaults to see the shape
Both lead to the same destination: a Studio-powered app that composes your components against your CMS data, previewable at every step.
Next
- Two ways to start: pick your onboarding path
- Set up Studio: the install + configure walk-through
- Register your components: the first step after install